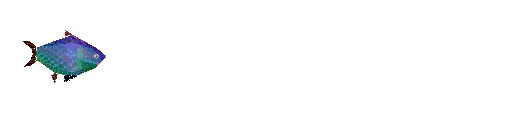
Seligor's Castle, fun for all the children of the world. Pastimes 4 U 2
Two more dresses for Anna, I will be placing another page at Pastimes 4 Uhere, And at Diddilydeedot's Dreamland in their Pastime Pages.
THESE DOLLS ARE FROM A BEAUTIFUL DESIGNER, WHO OVER THE YEARS HAS BUILT UP A
FABULOUS COLLECTION. I SENT HER AN EMAIL AND i'M PLEASED TO SAY THAT SHE
HAS GIVEN ME PERMISSION TO PLACE A FEW ON PASTIMES 4 U, HERE AT
SELIGORS CASTLE. PLEASE DO NOT USE AS YOUR OWN PRODUCT BUT DO PRINT AND DRESS FOR YOUR OWN USE. THANKYOU, SELIGOR.
A free paper doll outfit every Monday through Saturday, inspired by my life and thoughts.
I will not be placing many dolls here, Do pop over to Liana's for more.
SELIGOR'S CASTLE PRESENT'S THE LOVELY LIANA I have placed two more pages over at the Castle in Pastimes 4 U2.
http://www.joechip.net/liana/category/dolls/ DO BE CAREFUL AS YOU CUT OUT THE DOLL AND COSTUMES. IT IS A VERY GOOD IDEA TO PASTE / OR PRINT THE DOLL ONTO CARD AS THIS WOULD MAKE IT MORE STURDY.
I THINK THIS WILL NEED A LITTLE HELP FROM THE FAMILY. PASTIMES 4 U2 http://crafts.kaboose.com/
Tin Can Totem Poles
Total Time Needed:
1-2 Hours
Nothing sets the mood at summer camp
like a totem pole, especially one flickering in the light of a bonfire.
Make a tin can version for your backyard camp by painting your family
portraits on coffee cans.
To see the materials and instructions you will have to pop over to http://seligorscastle.zoomshare.com/26.html
MATERIALS FOR A 5-PERSON TOTEM POLE
5 coffee cans, each with 2 plastic lids that fit Can opener Water-based exterior paints in a variety of colors Paintbrushes Craft knife Scissors 4 clear plastic milk or water jugs, emptied and cleaned Marker Liquid laundry detergent bottle, empty and cleaned Wooden dowel 7/8 inch in diameter and 48 inches long Duct tape
Instructions
First, cut the bottom off each coffee can with a
can opener, then give a can to each person to paint his or her portrait
on.
While the paint is drying, choose the can that
you want to put on top of your totem pole and set 1 of its 2 lids to the
side.
Use a craft knife to cut a quarter-size asterisk in the center of
each of the other lids, then set the lids aside.
Next, use scissors to cut the ridged spout from
each plastic jug (recycle the rest of the jug) and set aside the spouts.
Finally, draw the wings on the detergent bottle,
as shown, and cut them ou
(recycle the rest of the bottle).
Once the cans are dry, place a lid on the top
and bottom of each, using the uncut lid for the top of the can that will
crown your totem pole.
As shown in the diagram at left, wrap a thick
layer of duct tape about 6 inches from the bottom end of the dowel, then
add the cans, jug spouts, and wings.
Place the finished totem pole in your yard by pushing the dowel into the ground.
PASTIMES 4 U2 More great help for father's day from Kaboose http://crafts.kaboose.com/ DON'T FORGET THIS SUNDAY JUNE 20TH IT IS FATHERS DAY AND TIME FOR YOU TO MAKE DAD A GREAT CARD AND MAYBE A GIFT.
What you'll need:
8"x10" piece of light cardboard
(cereal box, etc)
1 sheet green construction paper
9 shiny pennies
Green fine point marker
Pencil with eraser
Blue fine tip marker
Scissors
White craft glue
Glue stick
How to make it:
Fold the green construction paper and cardboard in half like a greeting
card. Place the cardboard on the inside of the green construction
paper, lining up the fold lines. Use a glue stick to attach the
cardboard to the construction paper. (See photo.)
Trim off the excess paper if needed. (See photo.)
Use pencil to lightly write "DAD" across the front of the card, leaving about 1.5" space underneath. (See photo.)
Use green fine point marker to draw dollar signs on "DAD" letters. Erase any pencil marks that might show through. (See photo.)
Use white craft glue to attach a penny to each corner of the D's, where
the curve meets straight lines, and at the center of the curve. Glue a
penny to the top of the letter A, and two at the bottom. (See photo.)
Write, "You're worth every penny!" underneath "DAD" with blue fine point marker.
Tips:
The pennies add quite a bit of weight to this card, so even card stock
or poster board is not sturdy enough, be sure to use the cardboard or
your card will not stand freely.
For a lightweight card, make photocopies of the pennies and cut them out and glue them on, instead of the real thing.
More great help for father's day from Kaboose
PASTIMES 4 U2 http://crafts.kaboose.com/
DOES YOUR DAD LIKE FISHING
Does your Dad love fishing ?
If so, he'll love this homemade
Father's Day card
featuring a pair of fish --
and a healthy
dose of creativity!
What you'll need:
1 sheet of blue construction paper
Patterned paper (stripes, polka dots, etc)
Scraps of yellow and green construction paper
Toothpick
3" string
2 medium wiggle eyes
Scrap of tan felt or paper
Scrap of white paper
Hole punch
Pen or pencil
Scissors
Glue stick
White craft glue
How to make it:
Fold the blue construction paper in half like a greeting card, set aside. (See photo.)
Draw a letter D on a piece of card and with mum's help make a template. Pencil draw the "D" onto the paper being used for the two fish and cut out.
Cut out one tail triangle and two smaller fin triangles (See photo.) from the yellow
construction paper. Repeat same with the green construction paper. Use a
glue stick to attach the tail and fins to the fish by gluing to the
back of the D shaped patterned paper. (See photo.)
Cut the pointed ends off of the toothpick. Tie the string to one end of
the toothpick and trim one end. This is your fishing pole letter "A". (See photo.)
First place your fish and your fishing pole (D A D) onto the front of
the card. Once you have them where you want them, use the glue stick to
attach the "D's" and the white craft glue to attach the "A". (See photo.)
Glue on wiggle eyes and use a sharp pencil to draw a hook at the end of the fishing line. Let dry completely.
Tips:
While patterned paper is cute, you can also have children make their
own by coloring white paper with markers or crayons and cutting out
your D's.
Use card stock instead of construction paper for a sturdier card.
Don't throw away any scraps, cut or tear them into small squares and
keep in a zipper gallon bag for future projects. Great for mosaics
PASTIMES 4U 2 FROM SELIGOR'S CASTLE
Keep All Your Odds and Ends Organized with One Simple Storage Solution
By Blythe Copeland Great Neck, NY, USA
A storage jar turned pincushion Credit: Courtesy of Suzanne
It's
easy enough for craft workers to store pins—after all, pincushions have been
getting the job done for generations. But to keep your sewing space
even more organized, turn an old Storage Jar into a combination
pincushion/storage spot with these instructions from Suzanne's Crazy for Collars that we found on Re-Nest.
A pretty pincushion works overtime for careful storage.
Storage Jars; my mum used to use these for bottling fruit in the summer, to use during the winter. I'm not sure whether they are used as much now but they are definitely for sale in any good iron mongers, as well as the old Car Boot and Garage Sales.
These jars are designed to have their lids come apart, so it's
easy to add some padding: just trace the top of the lid onto a piece of
spare fabric and cut it out, adding about 1.5 inches to the diameter;
then lay cotton balls or fibre fill onto the back of the fabric, place
the jar lid on top, and glue the edges of the fabric to the underside
of the lid. Now you can screw the ring of the lid back on, creating a
soft, fluffy top that holds onto your pins with a keep-anything storage
spot in the jar below.
Of course, you could use the decorative jars for storing just about anything,
adding your favourite patterns, colour, and embellishments to the top.
And since storage jars come in a variety of sizes (and are easy to
up cycle), you can keep track of everything from spare buttons to cat
treats without investing in expensive storage solutions.
Make A Leather Bracelet Out Of Your Old Belt
By Elizabeth Seward New York, NY, USA
Hemera Technologies/Jupiterimages
It's
a sad thing when we find we can no longer use a belt. It's an
especially sad thing if that belt was made from leather. The way I feel
is this: If we're going to kill an animal to make a product like leather
and hurt the environment in the process because of all of the pollution
involved in leather factories, we need to get as much life out of that
leather as possible.
The next time you can no longer use a leather belt that you have, consider turning it into a leather bracelet. Turning your old leather belt into a leather bracelet is easier than you may think.
How to Turn Your Worn or Doesn't-Fit Leather Belt into a Bracelet:
Wrap the belt around your wrist and leave an overlap of two inches.Cut this length with scissors or any other cutting tool.
Wrap the leather around your wrist again and find a comfortable place for snaps to be.
Punch or drill a hole through the leather overlap where you would like for snaps to be.
You can buy snaps at any craft store. Hammer a snap through your
hole you've drilled or punches.
You might have to wiggle it around a
bit for it to fit just right, but you should be able to get it wedged
in there.
That's it! Have fun. This is a great and stylish way to reuse that leather belt instead of throwing it out. You can buy the snaps from your shoe menders also
PASTIMES 4 U2
If you have any ideas do leave a message for me at dottido@hotmail.com
YOU LOVE THE JAPANESE MANGA AND THE STUDIO GHIBLI FILMS, NOW IT IS TIME TO TRY MAKING SOME CHARACTERS YOURSELF
A
new page with a new idea. It is here that Seligor wants to put things
that you can do and make in your spare times. All of them a little bit
different from the modern electronic stuff you all have nowadays. {shush
don't tell anyone, but Diddily loved her Nintendo, and I still like
Pacman and Mario the best with Donkey Kong a close third. } I
have lots of ideas that I'm hoping will interest you all and they are
to be done with the help of your older brothers and sisters as well as
Mum and Dad, so you can print off the page you want and then set to and
get them done. If you would like to take a photo of the finished article and email it to me at dottido@hotmail.co.uk I will put it on the website so everyone can see. I do hope you enjoy the new page. xxx's and hugs Diddily.
THE CRAFTY CARTOON SHOW SOMETIMES A CRAFT SOMETIMES A CARTOON TAKE YOUR PICK. Sure so the Easter eggs are gone but there is still Mothers Days all over the world. And Birthdays and Christmas. Parties, mega loads.
COME AND SEE WHAT IS ON OFFER IN SELIGOR'S CASTLE.
HAPPY CRAFTING AND CARTOONING
HAVE A WONDERFUL TIME MAKING GIFTS
SCARY SPIDER BRACELETS
Black construction paper
White paper (for "fangs")
Scissors - Wiggle eyes - Paper Clips Stapler and staples - White crayon Pencil - Glue
Fold the black construction paper in half. along folded edge, lay child's hand palm down (midway through palm) and trace fingers with white crayon Cut out the outline of the fingers. Unfold and you have a complete image of a spider with eight legs.
Now turn the spider over and with the pencil, roll the legs around the
pencil...this makes the legs curl under and gives a more creepy, crawly
effect Cut a 1" strip of black paper from the remaining scraps, and form
it into a circle for the bracelet part. At the appropriate length,
staple the ends together Attach the bracelet to the underside center of the spider using the paper clips Glue on the wiggle eyes and the "fangs" that you design and cut from the white paper to the spider's head
The child puts his/her fingers or wrist through the bracelet and then they can make their spiders creep and crawl with aback and forth
rocking motion of their wrists. The paper clips will allow the spider to
turn backwards and forwards as well as making a 360 degree angle also!
PASTIMES 4 U 2
Do your own Tie Dying
Dyes are substances that people use to colour textiles and other
materials. Some dyes come from plants. Cochineal, a red dye, comes from
the cochineal insect. To dye an object, dip it in water containing
dissolved dye. If dyes are fast, the object will keep its colour no
matter how often you wash it.
There are many beautiful
ways of dyeing fabric. You can make beautiful and attractive patterns
on your clothes. It's an interesting way to pass time and quite simple
too. So let us see how it is done.
Things you need
Dyes. Colours like yellow, blue, red, orange, maroon and green look splendid.
Water
Salt Pan Thick thread A bowl filled with chilled water. Plain white cloth on which you have to do your tie and dye.
Getting started
You
tie the thread to your cloth and then dye it. When the dye is dried,
you take off the threads and you find that there is a beautiful design
on your cloth. This is because the dye has not come on those areas
where you have tied the thread. That is how you get beautiful designs.
First
spread the cloth you wish to dye on the floor and make small dots with
the pencil leaving ample spaces amongst them. Now pick up the pencil
dot in a pinch and tie it with thread. Give the thread many turns in
order to cover the cloth so that it may be covered and would not get
colour on it, tie the thread very tightly. Tie each and every dot in
the same manner. Remember to leave proper spaces amongst each tied dot.
Dyeing
In
a pan, boil one cup water, add half a tea spoon salt and some die
(about one tea spoon) this amount of dye
Dyeing depends on the shade of colour
you want. If you want a light shade, add little dye and if you want
your cloth to be dyed dark, you will obviously add more dye.
Dip
your cloth in this boiling dye and stir it with a stick for a minute.
Meanwhile keep the chilled water ready. Take the water out of the dyed
cloth and immediately dip it into the chilled water.
Finishing
After
five minutes take the cloth out of the chilled water and keep it aside
to be dried completely. Now, start opening the threads you tied. You
will see that the colour has not reached on the tied portions. When you
will untie all the threads, iron your cloth and find a beautiful piece
of work.
There
is also another method of dyeing called
"MARBLING". To do this, shrink the cloth with your hands in a haphazard
manner and tie the thread tightly to make a dense small ball. Dye it
with the above mentioned method.When you think you are expert in dyeing
with one colour, you can also dye in two or even more than two colours.It's a fun and very interesting so do try it out!
Be sure that you have the right dye for the job. I recommend fiber
reactive dye. It is color fast and easy to find at your local craft
store. Prepare your dye according to the instructions that it came with. If
you do not mix the dye and water correctly, your dye will not be as
vivid or colorfast.
Wonderful ideas from the site of Hassam.
AN INDOOR GARDEN THAT YOU CAN HAVE FOR ANY DAY OF THE YEAR
A Thinking Garden for Easter.
This is a garden, a garden made on a large meat or dinner plate. The children from one of the churches I used to go to, made this kind of plate garden every Easter. It
is caller a "THINKING PLATE" and it is made so the children can express
there idea's as to how Jesus must have felt that Easter long, long ago,
when he knew he was going to have to be crucified on the cross, so that
he could save us all.
The most common garden is a growing one where you find a tray or plate. It
is important to get a tray with sides at least an inch deep, that way
the compost wont fall out. Put a good covering of composte into the
tray and level it out. Now you need to go out into the woods or park
and collect some moss, it grows on the ground, on the bark of trees and
sometimes in between the paving stones and garden walls. Take this home and lay it on the damp compost. Get a large coffee jar lid, cover it with tin foil, and bury it in the soil. This is now a pond, add pebbles, a few larger stones, a small shed from an old farm set etc.
Use your imagination, A Snow Scene for a snow garden ..... by changing the soil into cotton wool and setting the scene that
way. The supermarkets have little snowmen and things to decorate it with, try and make with your own hands as much as you can.
The rewards of seeing it day after day will be fantastic. You could even have a monthly theme for you and your friends. Monthly competitions that you all put 50p into a pot and each month a different parent will be the judge. Bits of wood and shells also look nice. Using
sand instead of soil, plenty of shells and driftwood, and using the
same pebbles, you can easily make a miniture beach garden. Don't forget to water the gardens occasionally if you have living things in it. There are so many types of gardens you can make. Christmas gardens, wow, what a lovely pressy for nanna and grandad. Buy some little figures with your pocket money or borrow the ones mum has if she is not making her own cake. Little sprigs of holly for trees, a small sheet of perspex then make it look like a frozen pond.
The Snow Garden can become a Christmas Garden with a few added bits and pieces. with a base of crinkled crepe paper, dotted with glue and then sprinkled with silver tinsel. Use silver baubles as decoration arrange them as a mountain range. Then there is a Fairy Garden, make little toadstools by cutting the inner roll off a roll of tinfoil into three inch lengths, glue half egg shells on top of each piece. Leave to dry and then paint them with pretty colours. I am sure if you look through Diddilys stories and rhymes you will see many pictures that you can follow. Here are a few toadstools you might like to copy. Use feathers as ferns, if you can't find any coloured ones, get white ones and dip them in food colouring.
What is in here? Do you know I have quite forgotten!
RIGHT SOMETHING ESPECIALLY FOR THE LADS, THOUGH SOME OF MY YOUNG GRAND DAUGHTERS WOULD WELL ENJOY MAKING THESE AS WELL.
Of course you can buy these already made from the "Joke Shop", but it's much more fun making your own. (Please don't tell Mum and Dad you got this recipe from me, it's our secret OK)
These are the ingredients, you will need. 1. One egg. A drop of milk. Half a teaspoon of sugar. And a tin that MUST have a lid that can be shut tight. (Cocoa tin, maybe) NOT GLASS OR RIGID PLASTIC, though bendy (supple) plastic can be used.
2. Next break the egg into the container, add the sugar and milk and shut
the lid tight. Put it in a warm place, preferably outdoors where
the sun can warm it up. Hidden behind the radiator if you
have to hide it indoors.
3. After a couple of weeks, take the tin and puncture the top with about two dozen little holes.
[You can use a compass point for this] BE CAREFUL,
NOW
ALL YOU HAVE TO DO IS HIDE IT SOMEWHERE IN THE LIVING ROOM AND WATCH AS
EVERYBODY SITS THERE SNIFFING, WONDERING WHO IT IS OR WHO IT MAY BE
THAT HAS PASSED WIND.
Please
don't take one into school though, for you will get into trouble with
your teacher and may end up like poor old Bart Simpson below.
DON'T FORGET TO ASK FOR HELP WITH THE KNIFE AND SCISSORS WHEN YOU CUT THINGS. ***** YOU MUST TAKE CARE AT ALL TIMES. *****
The
most wonderful thing about vegetables is the fact that they come in so
many shapes and sizes. I have been looking around many different
websites for people who have done this kind of thing, and I have
managed to put together a nice little group that you can copy,
especially for "Harvest Thanksgiving" and many Jewish Festivals. We all know of the "Hanukkah" and the Jewish Menorah, well this is a wonderful way for a child to make his/her own Menorah.
And all you need is two large potato's, lots of gorgeous shiney things to decorate them with.
Nine candles and some stronge PVC glue, but NOT instant glue, we can't have you sticking your fingers together. Then copy the pictures, it's as easy as that. You can even cover the potato with tinfoil or silver paper, then stick little stickers on them. Santa for Xmas, Chicks for Easter, not forgetting Christmas . Mummy
has often made a chocolate log. Well instead of a swiss roll, use any
shape veg you like, so long it will stand up and not go off too quick
and turn it into a wonderful table centrepiece, How's about a few
decorated apples for on the bird tables and strings of peanuts to make
a birdy mobile, with bits of fruit for the finches and the left over
nuts, after shelling for the tits. Think of all the Little Birthday gifts you could make.
Next we come to "Christingle." When I was a girl, we didn't have anything like these beautiful little lanterns that can be made in so many different ways, Very similar to the potato but use an orange instead 1. The large orange can be placed on a saucer or in a silver tray, (from the local supermarket) 2. then you will need four cocktail sticks, adorned with small pieces of fruit, unshelled peanuts, sweeties, piece of cheese. You
can ask the vicar of your parish what he would think suitable,
different countries have different ideas. The candle you use however
must be white, and not too big, you can get these from your local
Christian shop, maybe even the Salvation Army shops. The base of the candles you adorn with red ribbon and maybe some holly, ivy and mistletoe, like little Christmas wreaths. Remember to ask Mum or Dad to help with the hole for the candle. To
make some little veggie creatures you will need some of those little
eyes from the handcraft shops, different sizes, and of course the PVC
glue. Here are six little penguins made out of aubergines, with those little eyes. Here are a few other vegetable animals. try to use your imagination, let me know how you get on.
You could take a photo and email it to me. I can set up a special gallery web page. Hey this little egg is completely edible , doesn't he look lovely? And here is a special kind of icecream, Take a look at the video above, it is amazing how people make up these flicks for you to watch. Diddily
Look at Me I'm Flying A Kite by
Diddily Dee Dot
"Mummy would you help me make a kite please." "I'm
not sure I know how to make a kite my darling, your Daddy usually does
things like that and he won't be home till next Friday." "I know that Mummy but I think I should like a kite now." "Oh darling, I'm not sure I even know where to start, why do you need a kite now sweetheart, you never mentioned it before?" Morag looked up at her mum who was stood at the sink cleaning out the stick insects tank. "I do believe this old insect is on his last legs, or should I say four legs now." Morag jumped off the stool and went to watch the stick insect walk across the draining board. "It doesn't seem to bother him only having four legs instead of six, mum. Mum, as he's so old, do you think he will die soon?" "Well it's quite possible darling, the others didn't last long once their legs started to fall off, did they my lovely." Morag frowned "Will grandmama's legs drop off when she dies Mummy." Liz
turned towards the window hurridly, stifling a smile as she did so.
Regaining her composure she turned back to her inquisitive daughter. "No
my darling Grandmama won't lose anything when she dies, well I hope not
anyway," she said picking up her daughter and sitting her on the
bunker. "Who says Grandmama is dying anyway. Daddy has just gone to
look after her for a couple of weeks till she gets her strength back
after her operation." "Morag nodded her head. "Well that's ok then, so what are we going to do about this kite then. Liz
Banks picked up the ancient old stick insect and put it back in the
tank. She couldn't believe it had lasted so long, the other's had died
months back. "So my lovely why this sudden interest in a kite?" "Daddy,"
Morag replied, "Daddy, last night when he phoned he told me to wrap up
warm if I go out to fly my kite." she frowned again. "And well
Mummy, I didn't want to upset him but I haven't got a kite." she
shrugged her little shoulders and went back over to her stool and her breakfast. Mrs
Banks smiled. "Ah ha I see now, but I don't think Daddy meant you to go
fly a kite, I think he was telling you to keep warm if you go out because it was going to be very windy." "Oh bother," Morag shrugged again and continued to eat her porridge. "I suppose that's it then, no kite." Liz finished tidying up and popped the tank back up on the ledge. "There
you go old thing, watch you don't drown in your water now." The stick
insect moved up the new privet leaves and began to eat hungrily. "Mum,
can we try to make a kite, please. They must have how to make one on
the Internet that we could download and follow. Can we mum pleeease?" Liz
shook her head and a smile crossed her face. Her child was not even
five yet and already she was like a little old woman. It was so
difficult to refuseher anything, and making a kite, couldn't be that
hard to do. "Come on then let's see what we can find. The
two girls, one big, one little, sat down at the computer, many sighs
and groans came from Liz, and Morag thinking that it looked awfully
complicated joined in the sighing and the groaning. "It's no good my darling these are all seem so very complicated. I could look at these all day and none of it would make any sense." "Oh mummy, there must be something we can do." Liz
smiled at her daughter and this time tried the Google browser and there
it was, Make your own Kite" and it didn't look so complicated. "I've
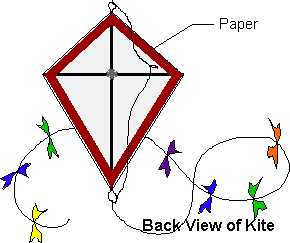
found one," she said winking at Morag Morag's face changed from almost tearfull to overjoyed. "Honest Mum, you think we can make it, oh wow look at all those diagrams?"
"Well, we can give it a go. The wind is quite gusty today and if we don't waste to much time, we should have it in the air after lunch time." "Right what do we need? Can we make two, one for you and one for me? What colour shall it be? Will we be able to give it a tail?" "Hold on, hold on Morag, let's make one first, then let's get what we need and then "let's make a kite."
If Mary Poppins can do it so can I." They both stood up and stared at
each other, Morag began to laugh, her Mum began to laugh and the fun began. It didn't take them long to get the stuff they needed, they decided
to use plastic for the kite as they had some nice plastic carriers from
the freezer shop, well big enough and nice and strong. The string
and twine was easy, as was the sticks and the bamboo for Mrs Banks was
a keen gardener. She even had an empty reel off a used fence wire to
roll the kite string on. Then whilst Liz was getting all these things
together. Morag had some pretty pieces of very light plastic to make
the tail bows out of, she had most of these finished by the time her
mum came back in from the garden. Then mum cut 80cm of string for the
tail and Morag fixed each of the bows onto it, about 10cm apart. Then
came the making of the kite, it was so exciting, they had everything
that was on the list and together on the kitchen floor they made there
kite. They only had one bad slip up and that was when Kelly Dog decided
to walk straight through the middle of everything, she ended up with
all the spare string wound round her back leg. "Oh dear Kell you
are a little bug." Morag told her off as she took the string off her
leg, "now you go and sit down quietly in the front room till we've
finished. Then you can come out with us, can't she Mummy?" "If she's good she can." Liz answered squinting at the dog. Kelly dropped her ears and sloped off into the front room and her cushion.
A couple of hours later and the kite was ready for its maiden
flight. The two of them, mother and daughter had tidied everything
away, put the harness on Kelly, wrapped up warm like daddy had told
them too and they were ready to go up to the common. Liz
carried the kite out to the car and put it very carefully in the boot.
Kelly was popped in the back and Morag jumped into her safety seat and
they were ready to go. "Hold on I forgot my gloves, have you got yours darling?" "Oops nope, I've left them on the kitchen bunker I think." Mrs Banks dashed back into the house and was back in the car before you could say Mary Poppins. Break off - clutch in - and it was away to the common. And the rest of the story you can see in these pictures. Morag's kite flew
wonderfully, it took both Mummy and herself to hold it for the wind was
a little bit on the strong side but wow, what a day they had. Morag
couldn't wait for her daddy to call that
night so she could tell him all about her wonderful time, first making
the kite, then flying it with Mummy. Kelly loved it too and by the time
they arrived back home they were all so tired from all the fresh air
and dashing around. After dinner, they cuddled down together on the
couch to watch Mary Poppins but long before they met her they were both
fast asleep. It was a wonderful day, not one Morag would forget for a
long time, if ever.
This little story is dedicated to our wonderful Kelly who sadly passed away to Dog's Heaven in February 2008


 irst, cut the bottom off each coffee can with a
can opener, then give a can to each person to paint his or her portrait
on.
irst, cut the bottom off each coffee can with a
can opener, then give a can to each person to paint his or her portrait
on. 


 SOMETIMES A CRAFT

 Pencil - Glue


 lours.It's a fun and very interesting so do try it out!


 like these beautiful little lanterns that can be made in so many different ways,


 Liz
turned towards the window hurridly, stifling a smile as she did so.
Regaining her composure she turned back to her inquisitive daughter.
Liz
turned towards the window hurridly, stifling a smile as she did so.
Regaining her composure she turned back to her inquisitive daughter. breakfast.
 What colour shall it be? Will we be able to give it a tail?"
 And the rest of the story you can see in these pictures. Morag's kite flew
wonderfully, it took both Mummy and herself to hold it for the wind was
a little bit on the strong side but wow, what a day they had. Morag
couldn't wait for her daddy to call that
And the rest of the story you can see in these pictures. Morag's kite flew
wonderfully, it took both Mummy and herself to hold it for the wind was
a little bit on the strong side but wow, what a day they had. Morag
couldn't wait for her daddy to call that night so she could tell him all about her wonderful time, first making
the kite, then flying it with Mummy. Kelly loved it too and by the time
they arrived back home they were all so tired from all the fresh air
and dashing around. After dinner, they cuddled down together on the
couch to watch Mary Poppins but long before they met her they were both
fast asleep. It was a wonderful day, not one Morag would forget for a
long time, if ever.
night so she could tell him all about her wonderful time, first making
the kite, then flying it with Mummy. Kelly loved it too and by the time
they arrived back home they were all so tired from all the fresh air
and dashing around. After dinner, they cuddled down together on the
couch to watch Mary Poppins but long before they met her they were both
fast asleep. It was a wonderful day, not one Morag would forget for a
long time, if ever.